Three Cost Effective Ways to Clean Plastic

Three Cost Effective Ways to Clean Plastic

Plastic products are so common these days that we have to clean plastic on a regular basis in one form or another. Plastic products can withstand the effects of the atmosphere and they do not get dirty as quickly as products of other materials. However, some of the plastic items in residential and commercial buildings do accumulate dirt and other types of gunk over the course of time. We recommend applying natural and less time-consuming methods in order to clean plastic. Below are discussed three useful methods to clean plastic using house cleaning agents:

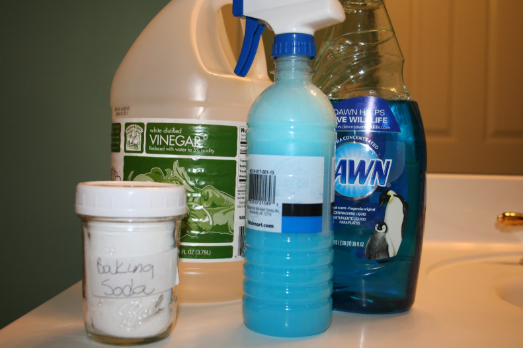
Plastic Cleaning Using Vinegar Cleaning Solution

Vinegar is highly effective in cleaning plastic products. We recommend preparing a vinegar cleaning solution by mixing vinegar and water. The steps involved in the House Cleaning process are as follows:

  1. Prepare an appropriate concentration of Vinegar cleaning solution and store it in a bottle with a nozzle.
  2. Now spray the cleaning solution on the plastic items that need cleaning.
  3. Rub the items with the help of a cloth or a rag. In case the stains are hard then we also recommend using a soft brush.
  4. Rinse the items under water after the stains have cleared.

Plastic Cleaning Using Bleach

We recommend using a bleach-cleaning agent when the stains are too hard to remove. Safety measures are advisable such as wearing gloves while performing the process to clean plastic. The steps involved are as below:

  1. Make a bleach cleaning service solution and store it in a bowl.
  2. Now, if the plastic item is small, place it inside the bowl for some time. If the item is large then we recommend cleaning process the dirty parts with the help of a cleaning rag.
  3. Take the item out of the solution after a few minutes.
  4. Now, rinse it properly with the help of water and remove any dirt by rubbing with a cloth.

Plastic Cleaning Using Baking Soda Solution

The baking soda cleaning solution is also effective in order to clean plastic and to remove hard stains on the surface of the items. We recommend preparing a solution of baking soda at home by mixing the baking soda powder in warm water. Follow the steps below to perform the process:

  1. Prepare the baking soda solution in a bowl.
  2. Now take a soft brush or clothing item in order to apply it on the plastic items.
  3. Apply the solution to the items and continue rubbing until the stains start to disappear.
  4. Rinse the items properly afterward.

The Ultimate Guide to House Cleaning and Organizing Routine

The Ultimate Guide to House Cleaning and Organizing Routine

House cleaning and organizing should be part of daily routine and habit since in this way the process will become more efficient and productive. Delaying the cleaning and organizing of house will only add to the muddle requiring more tedious work later to be sorted. Therefore, a schedule and process should be created in order to incorporate the cleaning tasks in daily chores so that the mess never gets out of the hand. A systematic process will simplify the problem and keep the conditions habitable for the residents. In this article, we will explain how the systematic house cleaning and organizing process can be created for effective working.

Figuring out the Cleaning and Organizing Requirements

The process can be divided into three different steps i.e. daily, weekly and monthly. There is a need to identify the areas in the house that need regular cleaning services and organizing. After identifying these areas, chores should be identified that need to be carried out in order to perform the house cleaning process. There will be some chores that can be performed in a few minutes while there will be those that require more time and effort to be completed. However, performing simple tasks requiring less time will also help streamline complicated chores. Those chores that can be performed in a few minutes should be part of the daily chores while those
requiring more time should be part of weekly and monthly chores. Below are discussed some of the daily, weekly and monthly chores that should be performed regularly in house cleaning.

Daily Cleaning and Organizing Chores

Some of the areas that require cleaning and organizing in the house include bedroom, kitchen, bathroom, living space, etc. The daily chores that should be performed in each area include:

  1. Bedroom: Making the bed, cleaning the dust, organizing clothes and laundry items.
  2. Bathroom: Drying the shower, cleaning the sinks and ventilating the bathroom.
  3. Kitchen: Cleaning dirty dishes, scrubbing and mopping spillages, removing crumbs and
    dust from the kitchen floor.
  4. Living Space: Vacuum cleaning the floor or carpet, organizing the area and getting rid of the garbage.

Weekly Cleaning and Organizing Chores

Some of the weekly cleaning and organizing chores that need to be performed as part of a routine are as follows:

  1. Bedroom: Replace the sheets and properly clean the soiled ones, gather those clothes that need laundering and vacuum clean the floor to remove dust and dirt.
  2. Bathroom: Once every week, scrubbing the toilets, sinks, bathtubs, counters, and shower should be carried out. There may be garbage sink in sinkholes that should be cleaned.
  3. Kitchen: Once every week, clean the significant areas in the kitchen with the help of a cleaning agent. Dust the cabinets, stove, sinks, counters, etc.
  4. Living Space: Scrub and disinfect the floor, walls and other areas in the living space.

Monthly Cleaning and Organizing Chores

Some monthly cleaning and organizing chores that should be performed are as follows:

  1. Bedroom: Once every month, the cabinets and drawers should be cleaned properly. Similarly, other hidden areas like under bed and furniture should be cleaned as well.
  2. Bathroom: Proper disinfecting process with the help of an agent should be
    performed once a month.
  3. Kitchen: Stove, oven, dishwasher, cabinets and other important equipment in the kitchen need to be cleaned once a month.
  4. Living Space: Disinfect and organize all areas and items in the living space. Properly clean plastic the garbage basket and any other item that affect the conditions of the living space.

How to Perform Heat Exchanger Cleaning Process?

How to Perform Heat Exchanger Cleaning Process

Heat exchanger cleaning is an important service sought in industries and household. Heat exchangers are extensively found in various industries such as power generation, steel industry, sugar, pulp, petrochemical industry etc. They are also found in major agricultural equipment where their large-scale use is of high importance for the farmers and the industry. Similarly, they are found in the household items such as A/C, refrigerator etc. Since they are actively involved in the heating and cooling process, they come in contact with cooling agents and air from outside. This leaves them susceptible to being contaminated. Various chemical deposits such as minerals and calcium can pile up between the coils of the heat exchanger. Similarly, dust particles can also start to pile up causing major problems.

Issues Caused by Contamination Heat Exchanger

There are a number of issues caused by the contamination and uncleanliness of heat exchanger hence emphasizing the need for regular heat exchanger cleaning and maintenance process. Some of the common problems caused are as follows:

  1. An unclean heat exchanger heats up more frequently leading to severe problems.
  2. The water control of the exchanger will be affected on there is clogging in the valves.
  3. Operating hours of the heat exchanger will be affected. It will take more time to
    perform the heat exchanging process. This, in turn, affects the overall efficiency of the system.
  4. The module will suffer wear and tear causing problems for the whole system.
  5. The overall life of the system may be affected due to the inefficiency of the heat
    exchanger.
  6. The system may take more energy to operate.

Heat Exchanger Cleaning Process

In order to perform the heat exchanger cleaning process, there is a need to first determine the exact nature of the problem. If there are chemical deposits in the heat exchanger then you may

need the services of a professional. In these cases, some cleaning agent will be required capable of dissolving the chemicals. A basis heat exchanger cleaning process is as follows:

  1. Drain the exchanger and isolate it to be cleaned.
  2. Place a ball valve between the return and supply vents of the heat exchanger so that other parts of the system can be protected.
  3. Now, the heat exchanger chamber is in front and it can determine whether chemical cleaning is required or not. In case there are chemical deposits then chemical cleaning will be required.
  4. Now, start vacuum cleaning the heat exchanger chamber and plates with the help of a high-grade cleaner. This will suck the dust, dirt and debris particles inside the chamber. Continue the process until the removable dust and debris have been removed.
  5. Now, add the cleaning agent into the chamber preferably with the help of pumps and hoses. The cleaning agent will circulate in the heat exchanger area and dissolve the deposited chemicals. The cleaning agent should be an appropriate solution, which can treat the deposited chemicals.
  6. Continue the circulation until the desired results have been achieved.
  7. Now, remove the cleaning services agent from the heat exchanger and clean it with water.
  8. Dry the equipment properly before using it in the system.

    If you want to know how to clean granite?. Then visit here clean granite

How to Clean Granite?

how to clean granite

There are a number of methods commonly used to clean granite-manufactured items, however, not all of them are as effective and some of them can even prove to be counterproductive. Granite material is used in the manufacturing of countertops, flooring, etc. in both commercial and residential buildings. They can become soiled and stained over the course of time due to which the process to clean granite needs to be performed on a regular basis. In this article, we will explain a process with the help of which people can clean granite items at home without damaging the quality of the material.

Necessary precautions before performing the granite cleaning process

There are some precautions that need to be considered before performing the granite cleaning process as the material can get damaged in case the precautions are not properly upheld. Two significant
precautions are as below:

  1. It is important to make sure that the granite surface is properly sealed before performing the process. In case, granite is not properly sealed then the water can seep through the surface of the material and damage it from inside. A number of tests are available which can test whether granite is properly sealed. These tests should be performed before performing the process to clean granite.
  2. We recommend using cleaners, which do not negatively react to granite material. People tend to use some natural cleaners such as vinegar, which can damage granite material and reduce its quality. The use of harsh commercial cleaners can also damage the surface of the material.

Steps involved in performing the granite cleaning process

The process to clean granite can be easily performed by anyone at home. Following steps can be followed in order to perform the granite cleaning process, however, it is also important to consider the precautions mentioned above.

  1. Use a dedicated cleaner for cleaning granite surfaces or prepare a cleaning solution of baking soda or hydrogen peroxide, which is effective in cleaning the material.
  2. Now rinse the granite material with the help of water so that dirt and other removable residues come off.
  3. Now apply the cleaning solution on the surface of the material.
  4. Rub the surface of the material with the help of soft microfiber cloth in order to remove stains and spillage marks from the surface of the material.
  5. Continue the process to clean granite until all the stains and spillages start to disappear.
  6. Let the granite surface dry in the end.

For more cleaning tips Clean Plastic.